|
1
|
- 9.1 List Boxes, Combo Boxes, and the File-Opening Control
- The List Box Control
- The Combo Box Control
- The OpenFileDialog Control
|
|
2
|
- Items can be placed into the list at design time or runtime
- The Sorted property causes items in the list to be sorted automatically
- If the Sorted property is set to True, then the following will place an
item into the list in order and assign the index of its position to num:
- num = lstBox.Items.Add(str)
|
|
3
|
- For the total number of items in a list box:
- lstBox.Items.Count
- For the index number of the currently highlighted item:
- lstBox.SelectedIndex
|
|
4
|
- lstBox.Items() is the list of items in the list box. The value of the item with an index of
"n" is:
- lstBox.Items(n)
- The data type of the elements in the lstBox.Items() array is
Object. To put the first element
of lstBox.Items in a text box:
- txtBox.Text = CStr(lstBox.Items(0))
|
|
5
|
- The currently highlighted item can be obtained by:
- lstBox.Items(lstBox.SelectedIndex)
- Or
- lstBox.Text
|
|
6
|
- To delete an item at a given location:
- lstBox.Items.RemoveAt(n)
- To delete the first occurrence of an item:
- lstBox.Items.Remove(str)
- To remove everything from a list box:
- lstBox.Items.Clear()
|
|
7
|
- Three main types of events with list boxes:
- Click – if the user clicks on an item in the list box
- SelectedIndexChanged - if the user clicks on an item or uses the arrow
keys to select it
- DoubleClick - if the user double-clicks on an item
- Click, DoubleClick, and SelectedIndexChanged events are triggered when
the user double-clicks.
|
|
8
|
- Private Sub lstOxys_SelectedIndexChanged(...)
- Handles
lstOxys.SelectedIndexChanged
- txtSelected.Text =
CStr(lstOxys.SelectedItem)
- End Sub
- Private Sub btnAdd_Click(...) Handles btnAdd.Click
- Dim item As String
- item = InputBox("Item to
Add:")
- lstOxys.Items.Add(item)
- End Sub
- Private Sub lstOxys_DoubleClick(...)
- Handles lstOxys.DoubleClick
-
lstOxys.Items.RemoveAt(lstOxys.SelectedIndex)
- txtSelected.Clear()
- End Sub
|
|
9
|
- Select the Items property of the list box.
- Click on the ellipses button on the right side of the Settings box. (A
window titled String Collection Editor will be displayed.)
- Type in the first item, and press Enter.
- Repeat Step 3 for each of the other items.
- When you are finished entering items, click on the OK button.
|
|
10
|
- A list box combined with a text box
- The user has the option of selecting from a list or typing in something
- Three types of combo boxes in the DropDownStyle property:
- Simple
- DropDown
- DropDownList
|
|
11
|
- Private Sub btnDisplay_Click(...)
- Handles btnDisplay.Click
- txtDisplay.Text = cboTitle.Text
& " " & txtName.Text
- End Sub
|
|
12
|
- Implements the standard File Open dialog box
- Normally the 37th control in the Tool Box
- When you place the control on the form, it will not be visible
- The icon and default name will appear in the pane below the Main area
|
|
13
|
|
|
14
|
- To display the control:
- OpenFileDialog1.ShowDialog()
- After the Open button has been pressed, the file name selected and its
complete filespec will be contained in the property:
- OpenFileDialog1.FileName
|
|
15
|
- Private Sub btnSelect_Click(...)
- Handles btnSelect.Click
- Dim textFile As String
- OpenFileDialog1.ShowDialog()
- textFile =
OpenFileDialog1.FileName
- Dim sr As IO.StreamReader =
-
IO.File.OpenText(textFile)
- lstOutput.Items.Clear()
- Do While sr.Peek <> -1
-
lstOutput.Items.Add(sr.ReadLine)
- Loop
- sr.Close()
- End Sub
|
|
16
|
- The Group Box Control
- The Check Box Control
- The Radio Button Control
- The Timer Control
- The Picture Box Control
- The Horizontal and Vertical Scroll Bar Controls
|
|
17
|
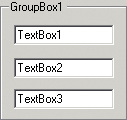
- Group boxes are passive objects used to group other objects together
- When you drag a group box, the attached controls follow as a unit
- To attach a control to a group box, create the group box, then drag the
control you want to attach into the group box
|
|
18
|
|
|
19
|
- Consists of a small square and a caption
- Presents the user with a Yes/No choice
- Checked property is True when the check box is checked and False when it
is not
- CheckedChanged event is triggered when the user clicks on the check box
|
|
20
|
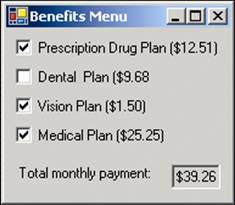
- Private Sub Tally(...) Handles chkDrugs.CheckedChanged,
chkDental.CheckedChanged, chkVision.CheckedChanged,
chkMedical.CheckChanged
- Dim sum As Double = 0
- If chkDrugs.Checked Then
- sum += 12.51
- End If
- If chkDental.Checked Then
- sum += 9.68
- End If
- If chkVision.Checked Then
- sum += 1.5
- End If
- If chkMedical.Checked Then
- sum += 25.25
- End If
- txtTotal.Text =
FormatCurrency(sum)
- End Sub
|
|
21
|
|
|
22
|
- Consists of a small circle with a caption (that is set by the Text
property)
- Give the user a single choice from several options
- Clicking on one removes the selection from another
- Normally Radio Buttons are attached to a Group Box
|
|
23
|
- To determine if the button is on or off
- radButton.Checked
- To turn a button on
- radButton.Checked = True
|
|
24
|
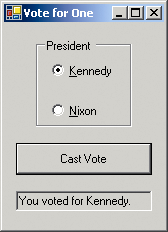
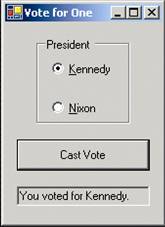
- Private Sub btnVote_Click(...)
- Handles btnVote.Click
- If radCandidate1.Checked Then
- txtVote.Text = "You voted
for Kennedy."
- ElseIf radCandidate2.Checked Then
- txtVote.Text = "You voted
for Nixon."
- Else
- txtVote.Text = "You voted
for neither."
- End If
- End Sub
|
|
25
|
|
|
26
|
- Invisible during runtime
- Triggers an event after a specified period of time
- The Interval property specifies the time period – measured in
milliseconds
- To begin timing, set the Enabled property to True
- To stop timing, set the Enabled property to False
- The event triggered each time Timer1.Interval elapses is called
Timer1.Tick.
|
|
27
|
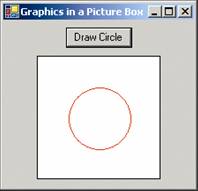
- Designed to hold drawings and pictures
- To draw a blue rectangle with the upper left hand corner x pixels from
the left of the picture box and y pixels from the top, with width w and
height h:
- picBox.CreateGraphics.
- DrawRectangle(Pens.Blue, x, y,
w, h)
|
|
28
|
- picBox.CreateGraphics.
- DrawEllipse(Pens.Red, 35, 35,
70, 70)
|
|
29
|
- A picture can be placed in a picture box control with the Image
property.
- Prior to setting the Image property, set the SizeMode property.
- AutoSize will cause the picture box control to be resized to fit the
picture.
- StretchImage will cause the picture to be resized to fit the picture
box control.
|
|
30
|
- A picture also can be assigned to a picture box control at run time:
- picBox.Image = Image.FromFile(filespec)
- The SizeMode property can be altered at run time with a statement such
as
- picBox.SizeMode = PictureBoxSizeMode.AutoSize
|
|
31
|
|
|
32
|
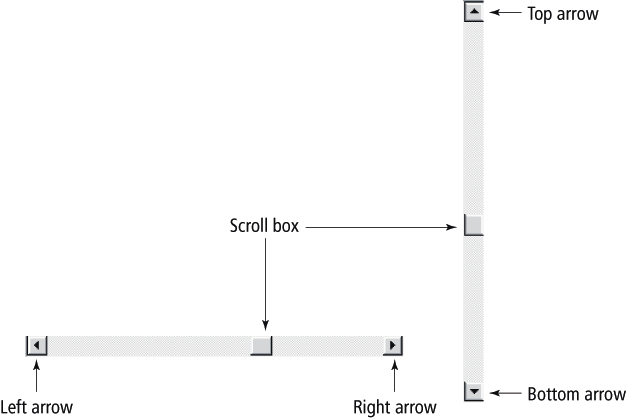
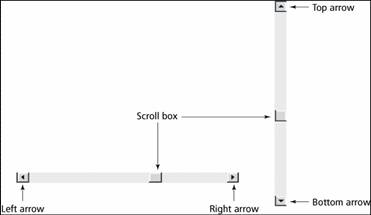
- When the user clicks on one of the arrow buttons, the scroll box moves a
small amount toward that button.
- When the user clicks between the scroll box and one of the arrow
buttons, the scroll box moves a large amount toward that button.
- The user can also move the scroll box by dragging it.
|
|
33
|
- The main properties of a scroll bar control are
- Minimum
- Maximum
- Value
- SmallChange,
- LargeChange
- hsbBar.Value is a number between hsbBar.Minimum and hsbBar.Maximum
|
|
34
|
- The setting for the Minimum property must be less than the setting for
the Maximum property.
- The Minimum property determines the values for the left and top arrow
buttons.
- The Maximum property determines the values for the right and bottom
arrow buttons.
- The Scroll event is triggered whenever any part of the scroll bar is
clicked.
|
|
35
|
- The Clipboard Object
- The Random Class
- The MainMenu Control
- Multiple Forms
|
|
36
|
- Used to copy information from one place to another
- Maintained by Windows so it can even be used with programs outside
VB.NET
- A portion of memory that has no properties or events
|
|
37
|
- To place something in the Clipboard:
- Clipboard.SetDataObject(str)
- To get something out of the Clipboard:
- Dim data As IDataObject = _
- Clipboard.GetDataObject()
- str =
CStr(data.GetData(DataFormats.Text))
- To delete the contents of the Clipboard
-
Clipboard.SetDataObject("")
|
|
38
|
- A random number generator declared with the statement:
- Dim randomNum As New Random()
- If m and n are whole numbers and m
< n then the following generates a whole number between m and n
(including m, but excluding n)
- randomNum.Next(m, n)
|
|
39
|
- Private Sub btnSelect_Click(...)Handles btnSelect.Click
- 'Display the winning lottery numbers
- Dim randomNum As New Random()
- Dim num1, num2, num3 As Integer
- num1 = randomNum.Next(0, 10)
- num2 = randomNum.Next(0, 10)
- num3 = randomNum.Next(0, 10)
- txtNumbers.Text = num1 &
" " & num2 & " " & num3
- End Sub
|
|
40
|
|
|
41
|
|
|
42
|
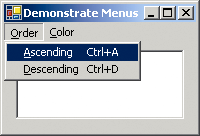
- Each menu item responds to the Click event
- Click event is triggered by
- the mouse
- Alt + access key
- Shortcut key
|
|
43
|
- VB.NET programs can contain more than one form
- To add the new form select Windows Form from the Templates pane,
optionally type in a name, and press the Open button.
|
|
44
|
- Local variables are declared with Dim
- Class-level variables are declared with Dim
- Variables declared with Public will be available to all forms in the
program.
- When a Public variable is used in another form, it is referred to by an
expression such as secondForm.variableName.
|

 Notes
Notes